A chatroom is a minimal chatting application. A chatroom is a minimal server that we can create and allow several clients to connect. All the clients that are connected to the server can transfer messages and data to one another via the central server. In this project, we will broadcast our message to every client connected to the server so that everyone can see the messages of other clients. For connecting the clients, both the server and the clients need to be either on the same machine or in the same network. The chatroom can work on the LAN only.
Introduction
A chatroom is nothing but a server that we can create and allow several clients to connect to the server. All the clients that are connected to the server can transfer messages and data to one another via the central server.
A chatroom is a minimal chatting application. We can use the code as a reference for creating the backend of a chatting application. We can further add frontend and any database to create a full-fledged chatting application. In our chat room, we will define a certain IP address and Port Number, and we will provide the IP address and Port number to our clients. So, a client can connect to the network using the address and port number. So, we can connect several users (as clients) and they can send messages.
In our project, we will be broadcasting our message so every user (client) connected to the network (server) can see the messages of one another. We can visualize the system as a group chat where all the group members (here all the clients) can transfer the message which is available to everyone present in that group.
Now for connecting the clients, both the server and the clients need to be either on the same machine or in the same network. Hence, the chatroom can work on the LAN only. We can further scale up our application by providing access to a remote server. But in this article, we will be using a pre-defined IP address and Port number to connect the clients on the LAN.
For creating a chatroom server and client(s), we use the concept of socket programming (Refer to the next section for detailed discussion). we will also be using the concepts of multi-threading to deal with the numerous clients. We can create a new thread every time a new client joins or requests the server. We will be learning about multi-threading in detail in the later section.
Now before learning about how to build a chatroom in Python. We should be familiar with the concepts of the client-server model as we are going to perform client-side scripting and server-side scripting in this article.
The client-server network model is one of the most widely used networking models. In a client-server network, a specific server and clients are connected to the server. Refer to the diagram below to see the basic overview of a client-server network system architecture.
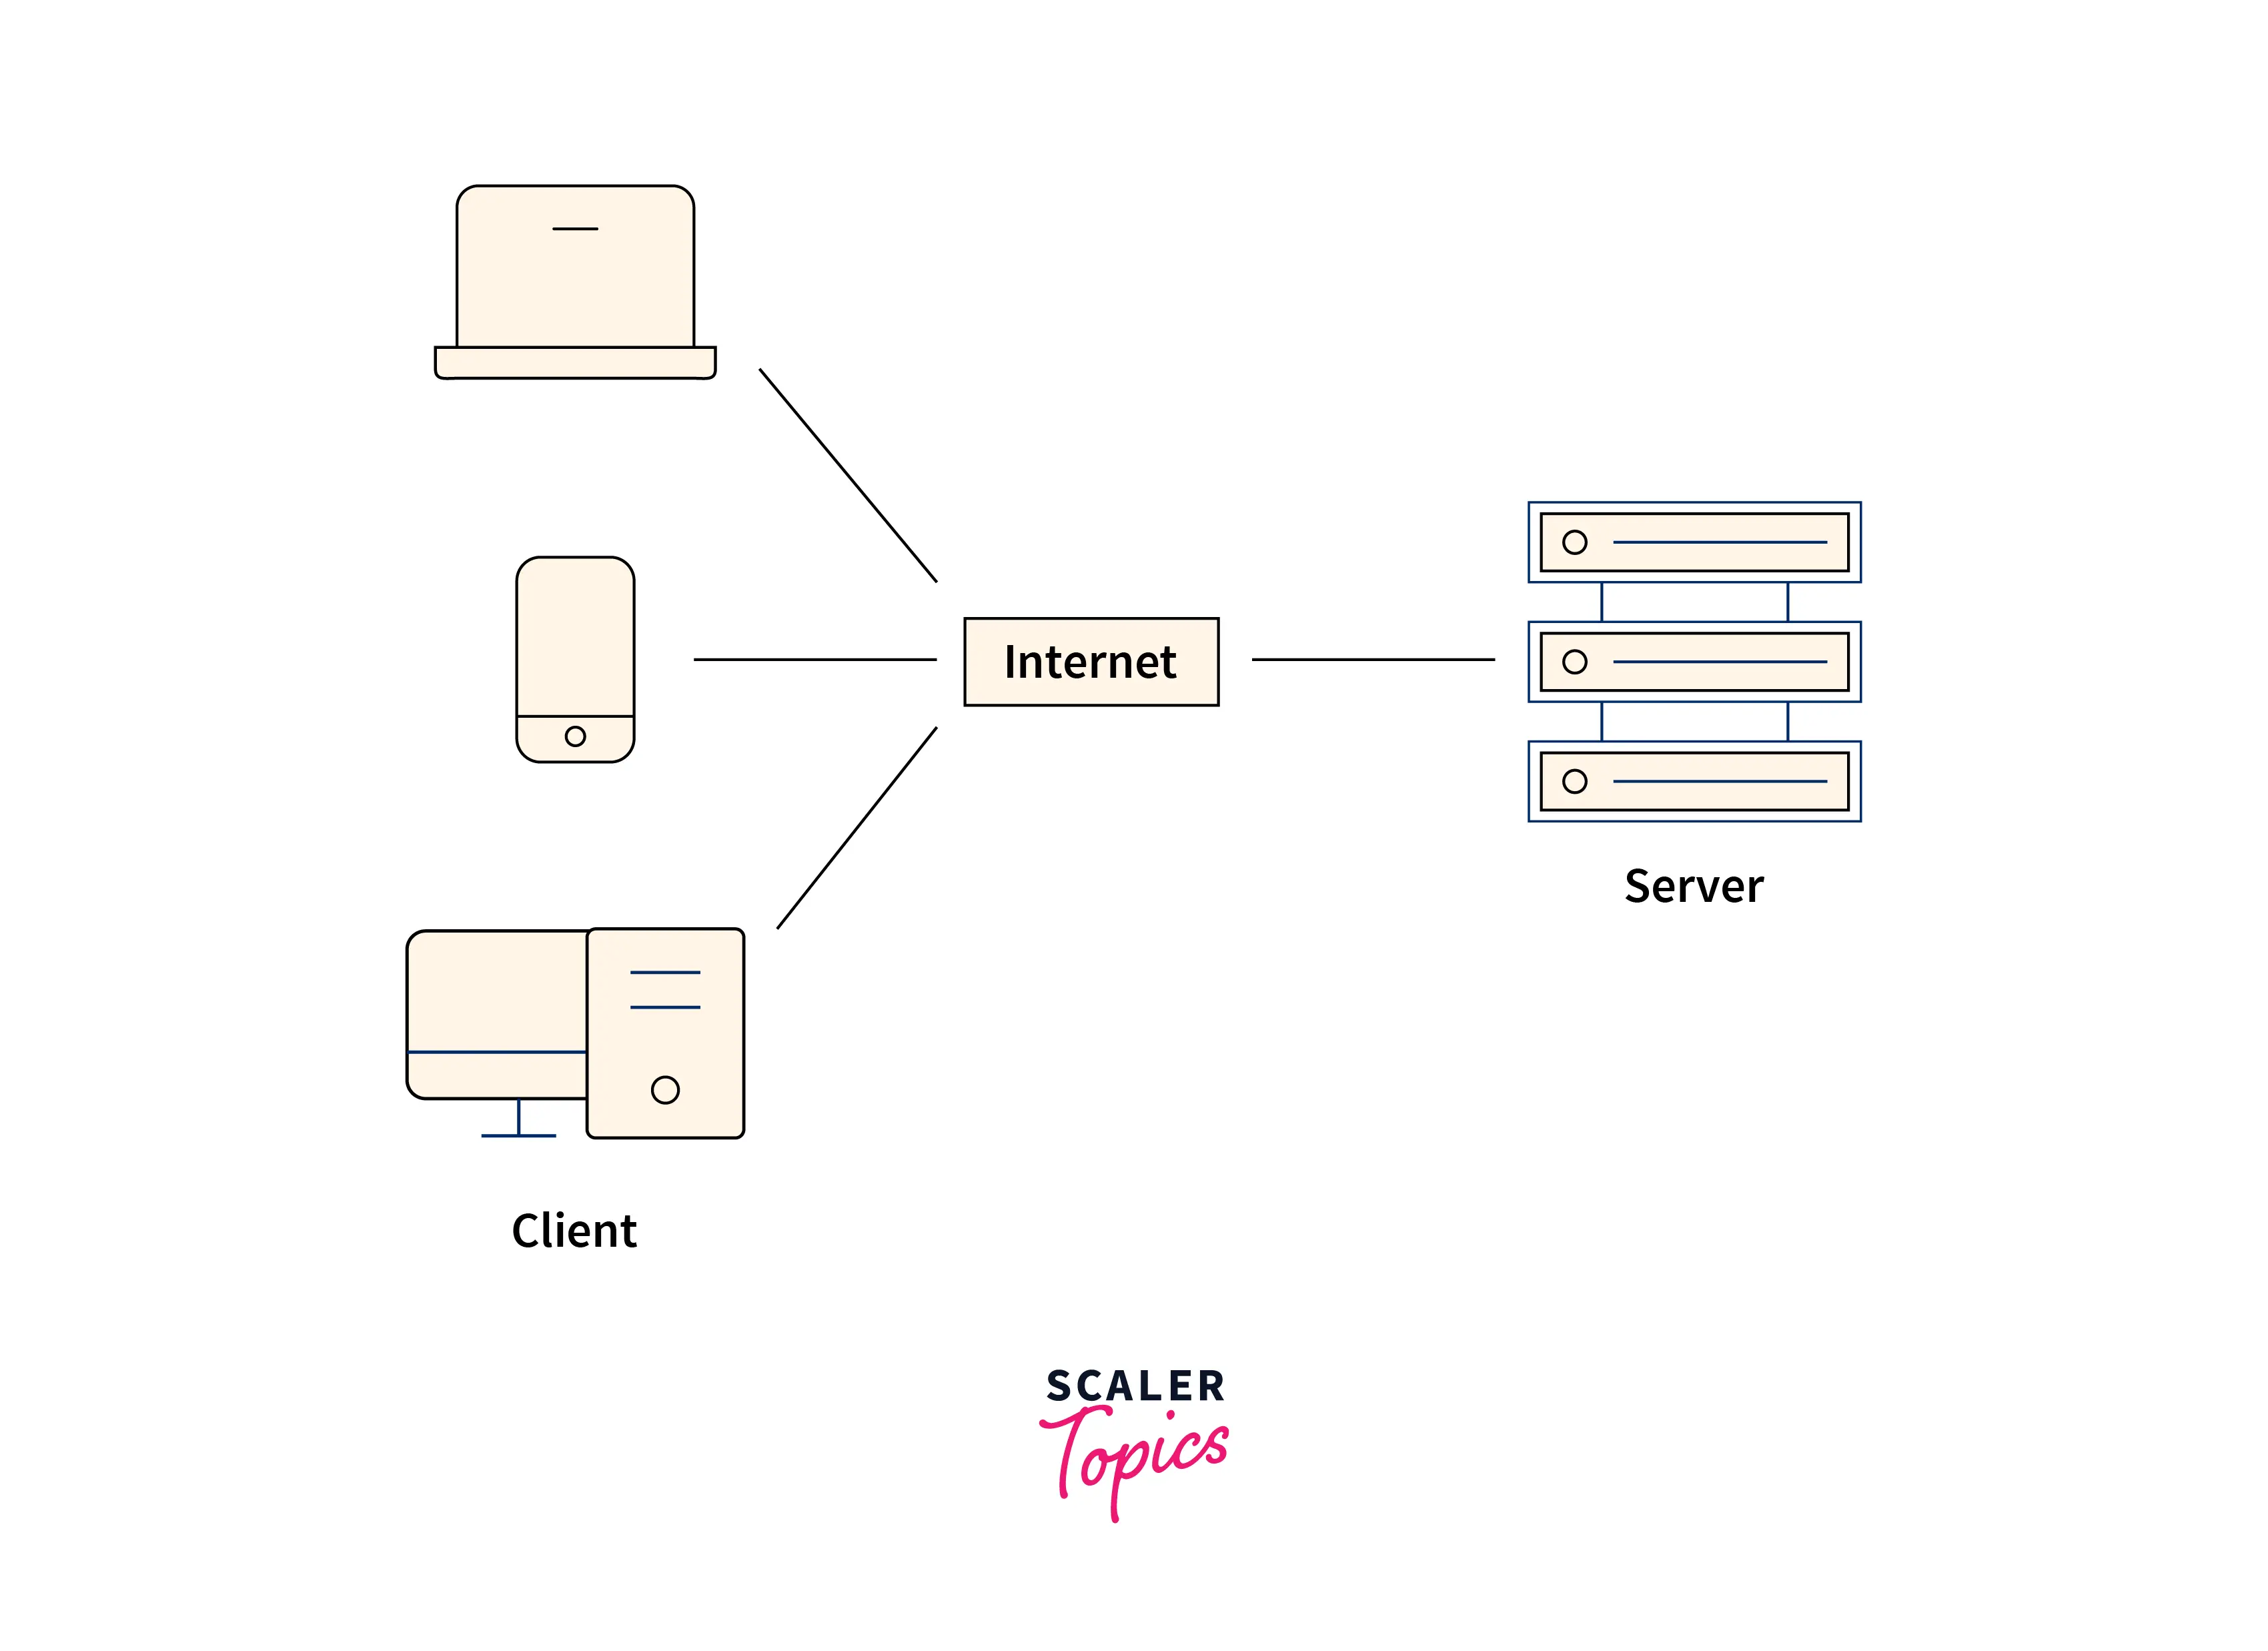
A client is a computer system that accesses the services provided by a server. On the other hand, a server is a powerful centralized hub that stores various information and handles the requests of the client(s).
The central computer system or the server is used to provide communication and resource sharing between other computer systems present on the network which are known as clients. A client does not share any of its resources, but it requests data or services from a server. A server is always ON so client machines can access the files and resources without caring whether the server computer system is ON or not.
We should be familiar with the basic concepts of Client-Side Scripting and Server-Side Scripting. Please refer to the article: Client-Side Scripting and Server-Side Scripting to learn more about the concepts of Client-Side Scripting and Server-Side Scripting.
Socket Programming
Let us now learn about one more important concept which is Socket Programming as it will be used in developing the chatroom in Python.
The communication in socket programming or the message delivery is based on sockets. A socket is bound to the port number so that the process is identified. We create sockets where the processes can connect and communicate. Let us learn about sockets as socket programming is nothing but dealing with sockets for communication. The communication in socket programming or the message delivery is based on sockets. We create sockets where the processes can connect and communicate. Let us learn about sockets as socket programming is nothing but dealing with sockets for communication.
How does the actual communication and identification of the client or server take place? First, the location of the destination computing node is identified using the IP address (Internet Protocol Address) of the node’s network. After identifying the network location of the computer node, we need to identify its actual physical address which is done with the help of the MAC address (Media Access Control Address). Finally, the actual communication has to be done between the processes, and the identification of the actual process is done with the help of the port address.
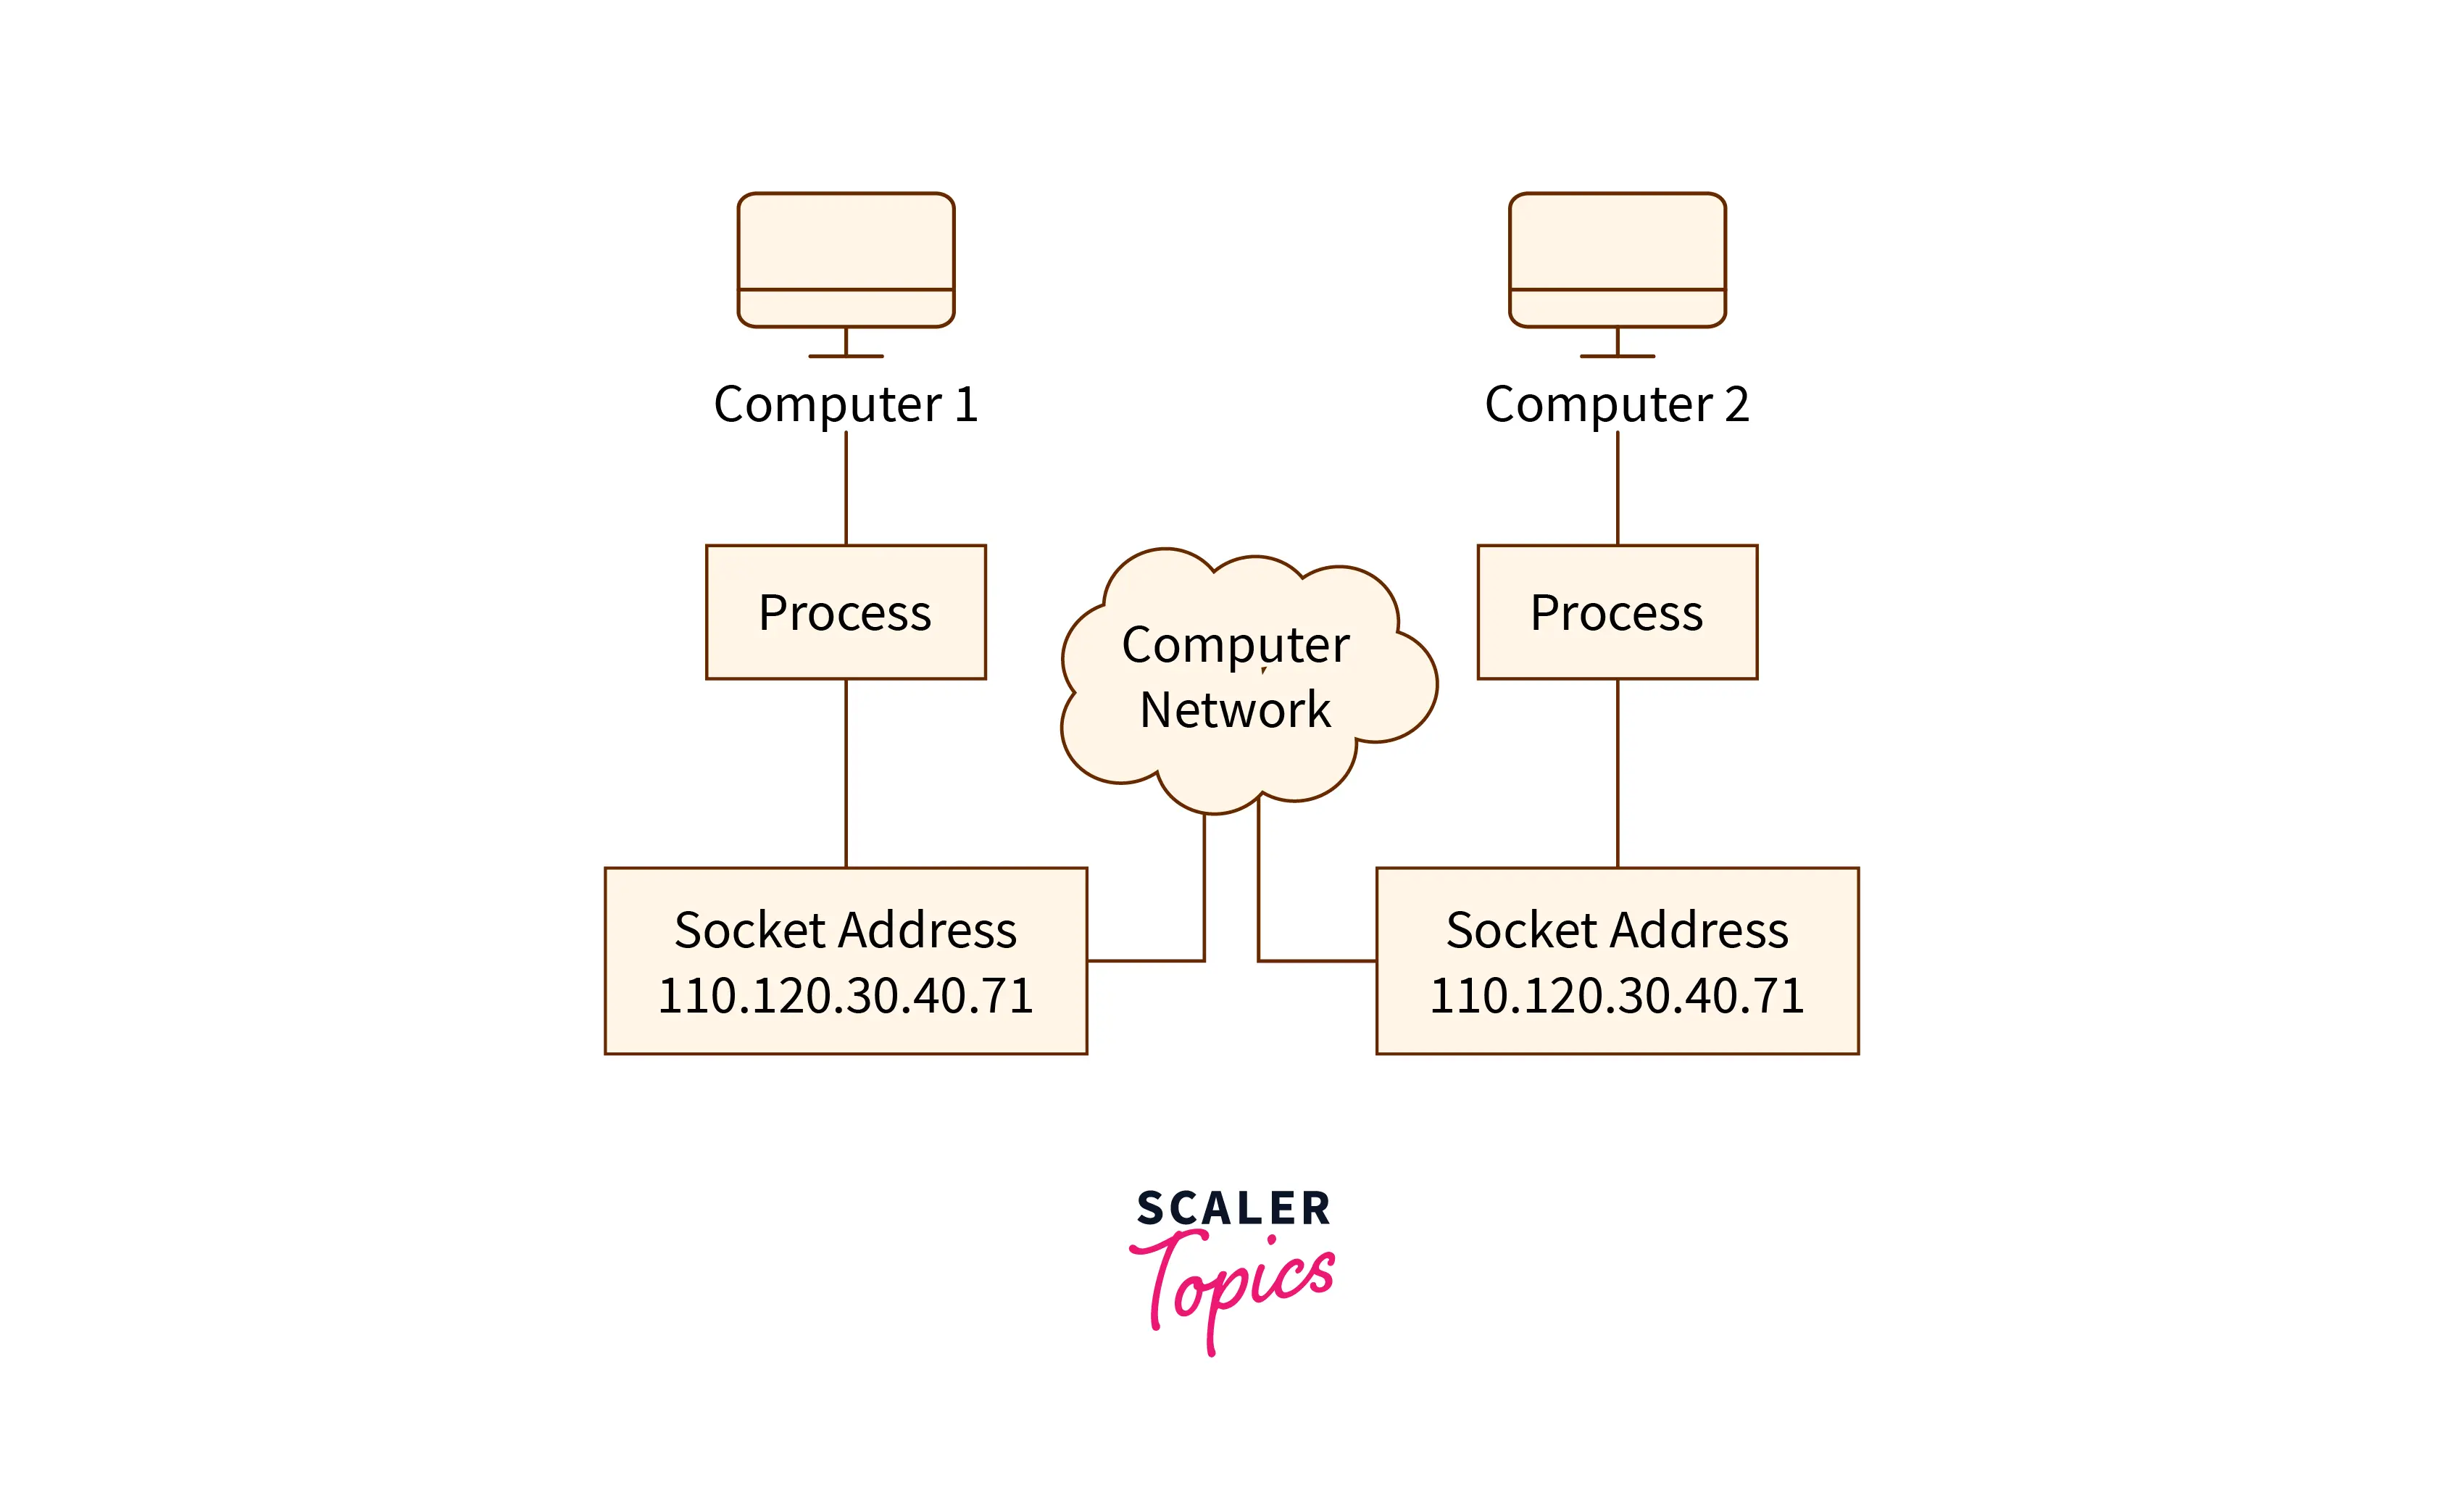
Socket Programming deals with sockets that help in making a two-way communication between two or more two programs present on the same or different network. We mainly use the concept of socket programming in the client-server network model. A socket of socket programming is comprised of a Port Number and an IP address. So, using both the address and number, a message gets to know the exact location to be delivered. The combined address is known as the Socket Address.
Refer to the diagram provided below for more clarity.
Socket Programming is a fairly huge topic of discussion. We should be familiar with the basic concepts of Socket programming. Please refer to the article: Socket Programming in Computer Network to learn more about the concepts of Socket Programming.
Multi-Threading
Let us now learn about one more important concept which is Multi-Threading as we will be making threads for clients in developing the chatroom in Python.
The multi-threading means multiple threads. So, what is a thread? A thread is a line of execution in a program. We can say that a thread is a lightweight process. A thread is a direction or path taken by the program for its execution. Threads help us to achieve multiprogramming where a program or process can operate more efficiently by executing more than one instruction at a time. A thread helps a complicated or larger task to be operated in the background without interrupting the main program.
Multi-threading is a concept in modern operating systems that refers to two or more tasks executing concurrently within a single program.
Multithreading can likewise handle differing requests from unchanging clients. The user requests for a program or whole help are traced as a new thread (every client is treated as a unique identity). In our program, we will create a thread whenever a new client joins in and we will destroy the thread whenever the client exits the system. We should be familiar with the basic concepts of Multithreading in Python. Please refer to the article: Multithreading in Python to learn more about the concepts of Multithreading in Python.
Server Side Script
The server has to accept several requests from the server. So, the server has to uniquely identify a new client’s request. So, we will allow the clients to connect to the server using the IP address and for the unique identification, we can assign a name to the client. This name will also help us to display the user’s message when the user sends any message.
After connecting and assigning the name, we can collect all the incoming messages and broadcast the message so that all the clients (the rest of the users) can see the message just like in a group chat.
In our implementation, we will be using some in-built modules of Python like socket, sys, time, select. We are familiar with all these modules but the select module is a fairly new thing to us. So what is the working of this select module? Well, for getting the Operating System level monitoring operations, we can use the select module. This module comes in handy when we have to monitor several requests simultaneously. We can avoid using the select module and just run a loop for every request but the select module makes the work efficient and easy for us.
How to Build a Chatroom in Python – Server-Side Steps
- Import the necessary modules.
- Define the header length, Port Number, and IP Address.
- Setup our socket using
socket.socket()method. - Allow the socket to use the already defined address again and gain.
- Now, we have to bind the socket with the IP address and Port Number.
- Start listening to the pocket using the
listen()method. - We should also make a list or rather a set (because the set only contains the unique element, so only a unique request will be handled) to contain all the clients or users.
- Finally, we can receive the messages from the clients and start dispersing the message to the rest of the clients. We should use a
try-except(exception handling) block because we are handling a message from the external client and this can generate an error.- For receiving the message, we can use the
socket.recv()method. - We can close the connection using the
socket.close()method. - We can run a loop and accept messages and if a new request comes then we can append the user in the clients set.
- For receiving the message, we can use the
Let us now look at the code implementation and working of all the lines that are included in the comments.
Implementation
# importing the necessary modules.
import socket
import select

# defining the header length.
HEADER_LENGTH = 10

# defining the IP address and Port Number.
IP = "127.0.0.1"
PORT = 1234

"""
Creating a server socket and providing the address family (socket.AF_INET) and type of connection (socket.SOCK_STREAM), i.e. using TCP connection.
"""
server_socket = socket.socket(socket.AF_INET, socket.SOCK_STREAM)

"""
Modifying the socket to allow us to reuse the address. We have to provide the socket option level and set the REUSEADDR (as a socket option) to 1 so that address is reused.
"""
server_socket.setsockopt(socket.SOL_SOCKET, socket.SO_REUSEADDR, 1)

# Binding the socket with the IP address and Port Number.
server_socket.bind((IP, PORT))

# Making the server listen to new connections.
server_socket.listen()

# List of sockets for select.select()
sockets_list = [server_socket]

# A set to contain the connected clients.
clients = {}

print(f'Listening for connections on IP = {IP} at PORT = {PORT}')


# A function for handling the received message.
def receive_message(client_socket):
    try:
        """
        The received message header contains the message length, its size is defined, and the constant.
        """
        message_header = client_socket.recv(HEADER_LENGTH)

        """
        If the received data has no length then it means that the client has closed the connection. Hence, we will return False as no message was received.
        """
        if not len(message_header):
            return False

        # Convert header to an int value
        message_length = int(message_header.decode('utf-8').strip())

        # Returning an object of the message header and the data of the message data.
        return {'header': message_header, 'data': client_socket.recv(message_length)}

    except:
        return False


# running an infinite loop to accept continuous client requests.
while True:
    # Read the data using a select module from the socketLists.
    read_sockets, _, exception_sockets = select.select(
        sockets_list, [], sockets_list)

    # Iterating over the notified sockets.
    for notified_socket in read_sockets:
        """
        If the notified socket is a server socket then we have a new connection, so add it using the accept() method.
        """
        if notified_socket == server_socket:
            client_socket, client_address = server_socket.accept()

            # Else the client has disconnected before sending his/her name.
            user = receive_message(client_socket)

            # If False - client disconnected before he sent his name
            if user is False:
                continue

            # Adding the accepted socket to select.select() list.
            sockets_list.append(client_socket)

            # Also adding the username and username header.
            clients[client_socket] = user

            print('Accepted new connection from {}:{}, username: {}'.format(
                *client_address, user['data'].decode('utf-8')))

        # Else the existing socket is sending a message so handling the existing client.
        else:
            # Receiving the message.
            message = receive_message(notified_socket)

            # If no message is accepted then finish the connection.
            if message is False:
                print('Closed connection from: {}'.format(
                    clients[notified_socket]['data'].decode('utf-8')))

                # Removing the socket from the list of the socket.socket()
                sockets_list.remove(notified_socket)

                # Removing the user from the list of users.
                del clients[notified_socket]

                continue

            # Getting the user by using the notified socket, so that the user can be identified.
            user = clients[notified_socket]

            print(
                f'Received message from {user["data"].decode("utf-8")}: {message["data"].decode("utf-8")}')

            # Iterating over the connected clients and broadcasting the message.
            for client_socket in clients:
                # Sending to all except the sender.
                if client_socket != notified_socket:
                    """
                    Reusing the message header sent by the sender, and saving the username header sent by the user when he/she connected.
                    """
                    client_socket.send(
                        user['header'] + user['data'] + message['header'] + message['data'])
Client-Side Script
The client sends the requests to the server. So, the client has be to uniquely identified by the server. So, we will send our user name for the unique identification on the server side. we can assign a name to the client. This name will also help us to display the user’s message when the user sends any message.
In our implementation, we will be using some in-built modules of Python like socket, sys, time, errno. The initial setup for the client-side scripting is quite similar, we import the necessary header files, define the header length, assign the IP address and Port Number, and ask for the user name of the client.
How to Build a Chatroom in Python – Client Side Steps
- Import the necessary modules.
- Define the header length, Port Number, and IP Address.
- Accept the name of the client or user.
- Setup our socket using
socket.socket()method. - Allow the socket to use the already defined address again and gain.
- Now, we have connected the socket with the IP address and Port Number using the
connect()method. - Set the
recv()method to a non-blocking method. We are setting the connection to a non-blocking state so that the recv() function call will not get blocked. It will return some exceptions only. - After that we set the user name, and header and encoded the username into bytes, counted the number of bytes, and then prepared a header of fixed size, that we have encoded to bytes as well.
- We will now run an infinite loop to send continuous client requests.
- In the loop, we will first get the user message, and then encode the message into bytes, count the number of bytes, and then prepare a header of fixed size, that we have encoded to bytes as well.
- After encoding, we will send the message along with the message header.
- We will also loop over the received messages because there can be more than one message from other clients.
- We will decode the messages and print them. Here, we will print all the messages except the current user’s message.
Let us now look at the code implementation and working of all the lines that are included in the comments.
Implementation
# importing the necessary modules.
import socket
import sys
import errno

# defining the header length.
HEADER_LENGTH = 10

# defining the IP address and Port Number.
IP = "127.0.0.1"
PORT = 1234

# Getting the name of the client.
my_username = input("Username: ")

"""
Creating a client socket and providing the address family (socket.AF_INET) and type of connection (socket.SOCK_STREAM), i.e. using TCP connection.
"""
client_socket = socket.socket(socket.AF_INET, socket.SOCK_STREAM)

# Connecting the socket with the IP address and Port Number.
client_socket.connect((IP, PORT))

"""
Setting the connection to a non-blocking state so that the recv() function call will not get blocked. It will return some exceptions only.
"""
client_socket.setblocking(False)

# Setting the username and header.
username = my_username.encode('utf-8')
username_header = f"{len(username):<{HEADER_LENGTH}}".encode('utf-8')

"""
Here, we have encoded the username into bytes, counted the number of bytes, and then prepared a header of fixed size, that we have encoded to bytes as well.
"""

# sending the data.
client_socket.send(username_header + username)


# running an infinite loop to send continuous client requests.
while True:
    # Getting user input.
    message = input(f'{my_username} > ')

    # Sending the non-empty message.
    if message:
        """
        encode the message into bytes, counted the number of bytes, and then prepared a header of fixed size, that we have encoded to bytes as well.
        """
        message = message.encode('utf-8')
        message_header = f"{len(message):<{HEADER_LENGTH}}".encode('utf-8')
        # sending the message.
        client_socket.send(message_header + message)

    try:
        # looping over the received messages and printing them.
        while True:
            # getting the header.
            username_header = client_socket.recv(HEADER_LENGTH)

            # If no header is accepted then finish the connection.
            if not len(username_header):
                print('Connection closed by the server')
                sys.exit()

            # Converting the header to an int value.
            username_length = int(username_header.decode('utf-8').strip())

            # Decoding the received username.
            username = client_socket.recv(username_length).decode('utf-8')

            # Decoding the received message.
            message_header = client_socket.recv(HEADER_LENGTH)
            message_length = int(message_header.decode('utf-8').strip())
            message = client_socket.recv(message_length).decode('utf-8')

            # Printing the message.
            print(f'{username} > {message}')

    except IOError as e:
        # handling the normal error on nonblocking connections.
        if e.errno != errno.EAGAIN and e.errno != errno.EWOULDBLOCK:
            print('Reading error: {}'.format(str(e)))
            sys.exit()

        # If we did not receive anything, then continue.
        continue

    except Exception as e:
        print('Reading error: '.format(str(e)))
        sys.exit()
Output
Server
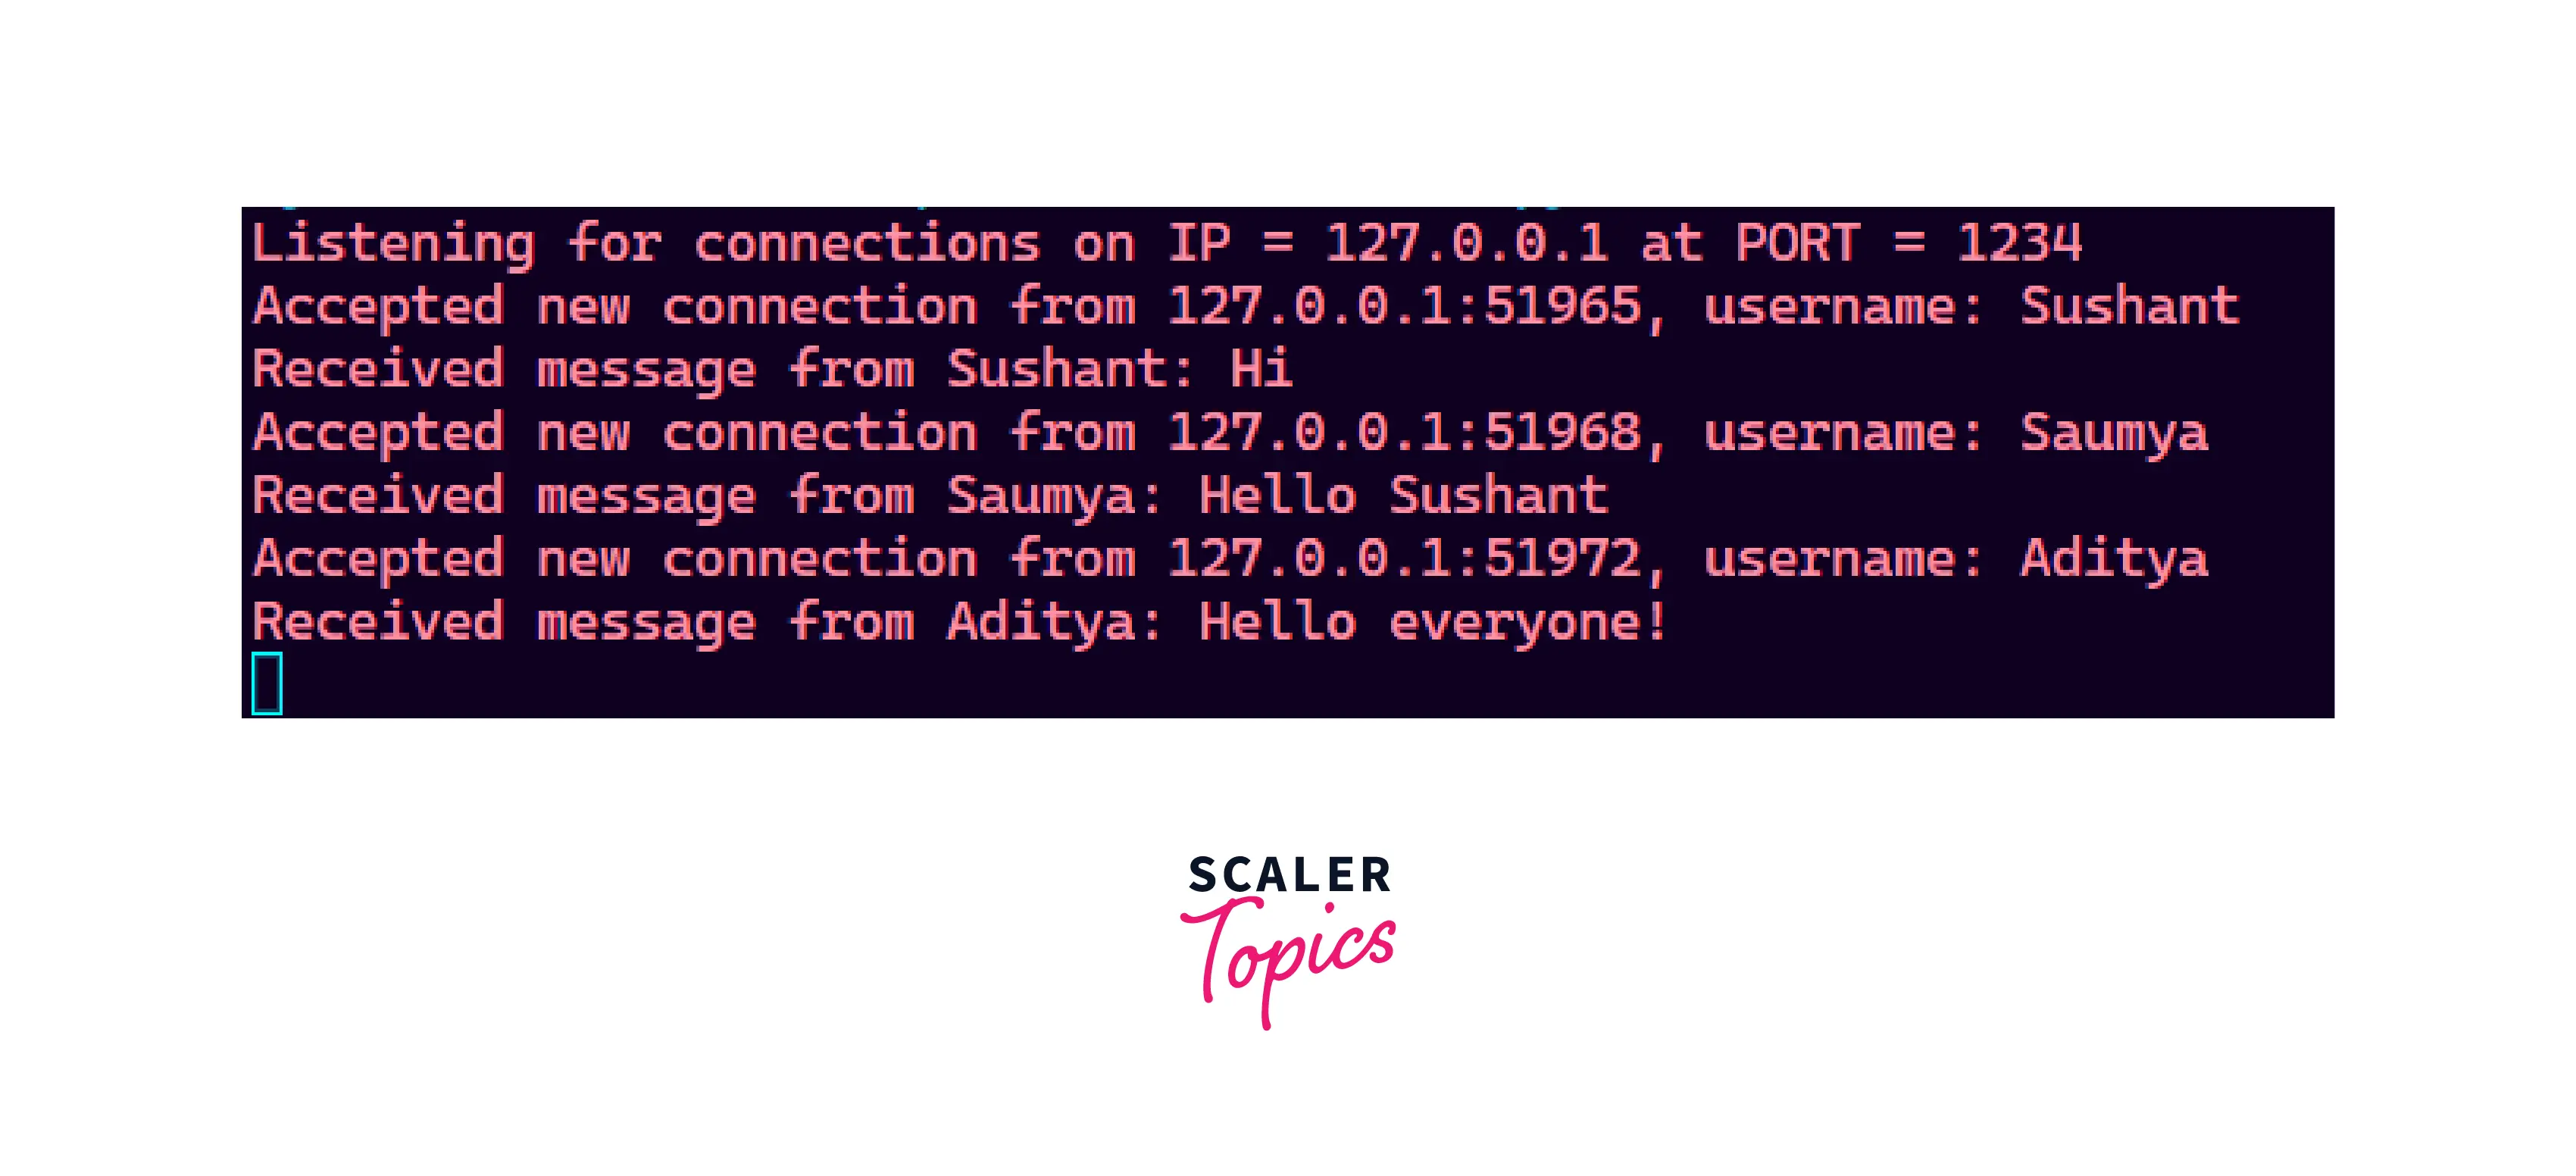
As we can see first the IP address and then the Port Number are displayed. Now, whenever a new client is added then we are displaying that a new connection is added along with the IP address of the user (client), the Port Number of the user, and the user name of the user.
Whenever a client sends a message, the message is broadcasted.
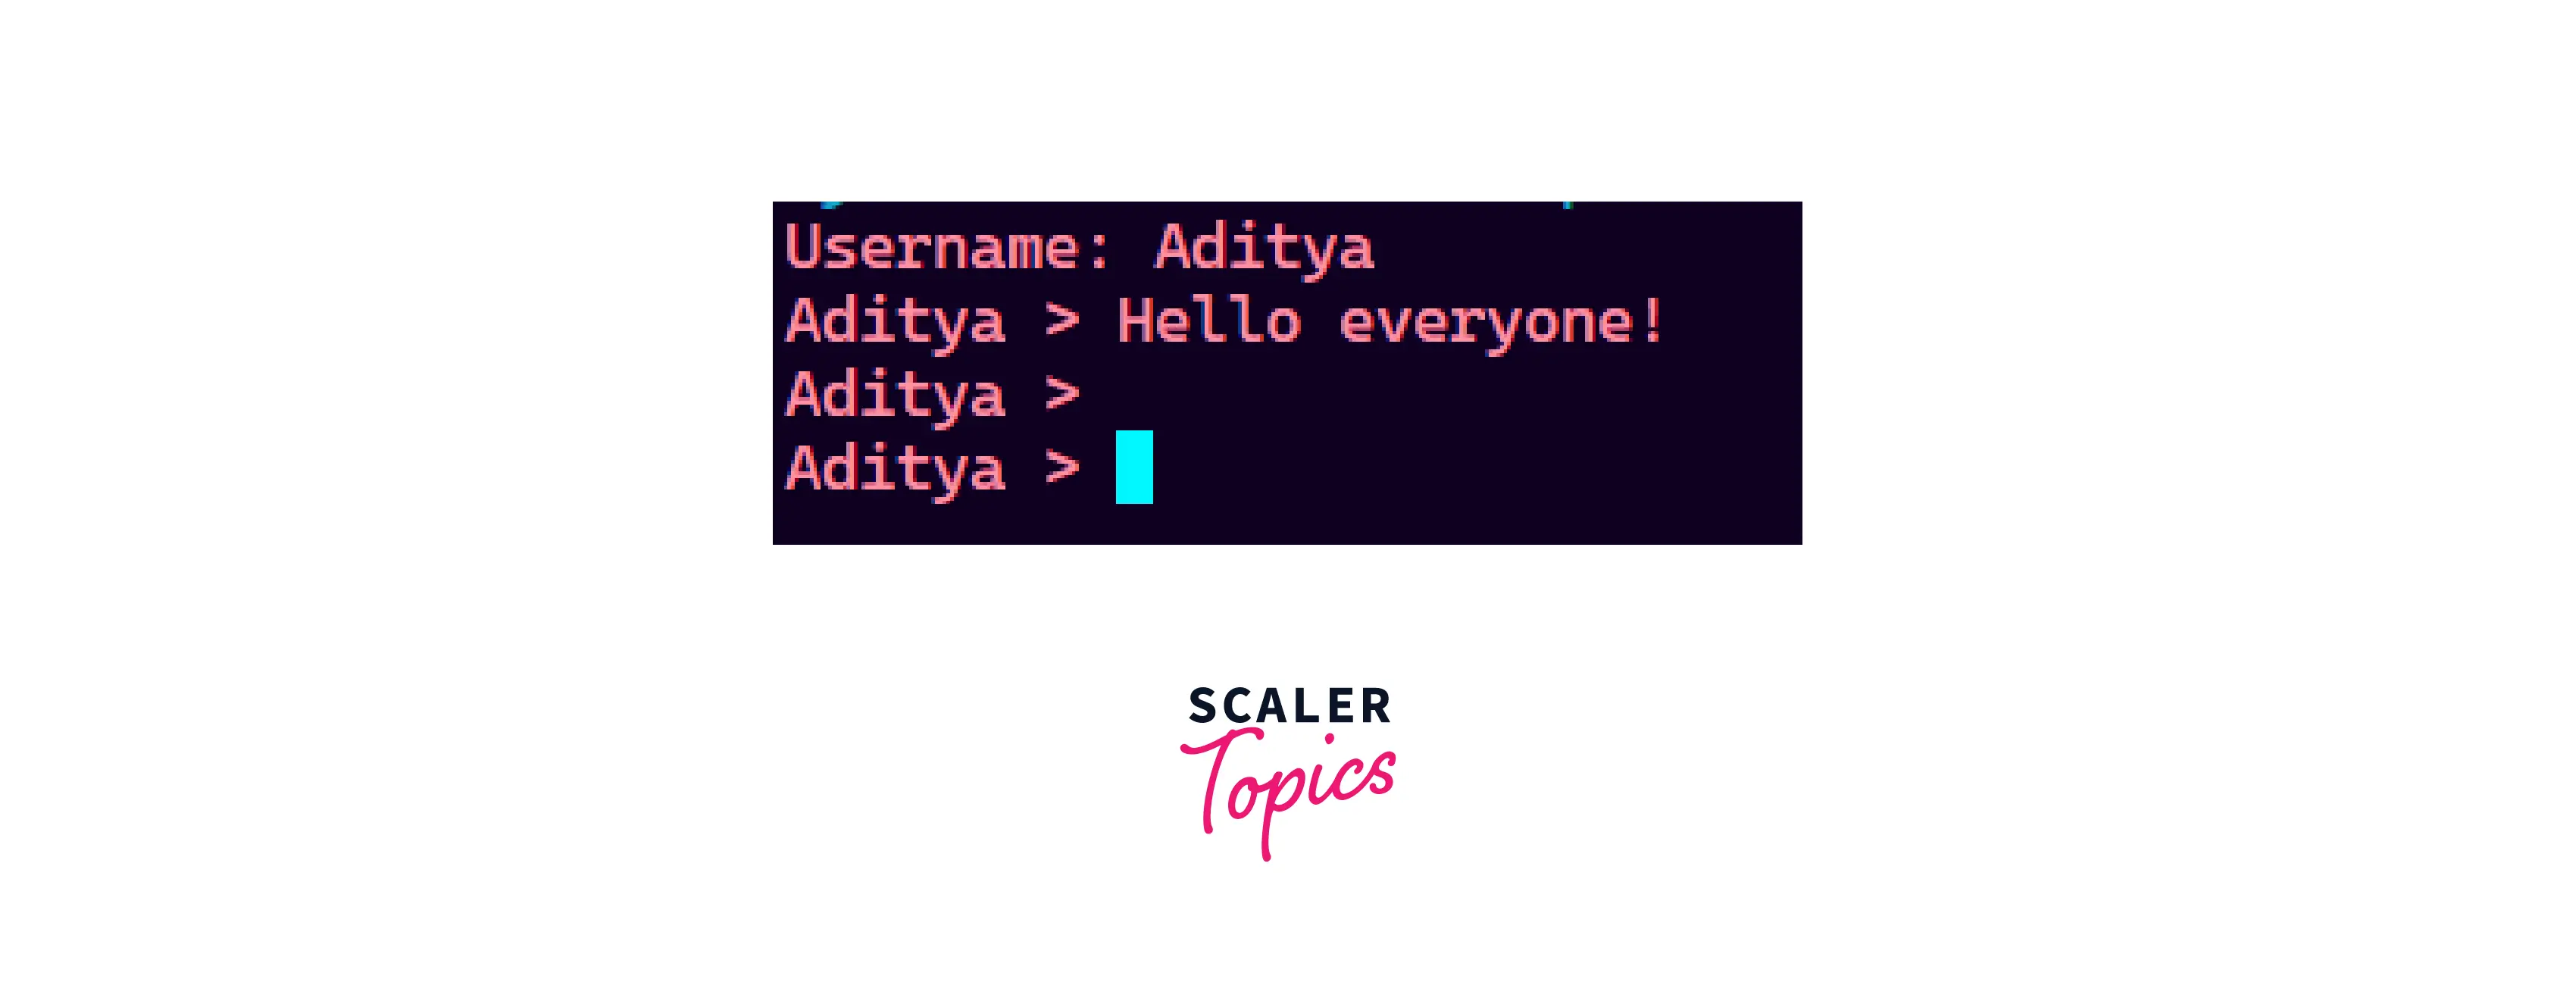
Client(s)
Whenever a client joins, he/she is asked to enter the name, and then he/she can send the message. In the below pictures, we can see several clients getting connected and sending messages.
Client-1 (Sushant)

Client-2 (Saumya)

Client-3 (Aditya)
Conclusion
- The client-server network model is one of the most widely used networking models. In a client-server network, a specific server and clients are connected to the server.
- A chatroom is a minimal chatting application. A chatroom is a minimal server that we can create and allow several clients to connect to the server.
- In a chatroom, all the clients that are connected to the server can transfer messages and data to one another via the central server.
- For connecting the clients, both the server and the clients need to be either on the same machine or in the same network. Hence, the chatroom can work on the LAN only.
- For creating a chatroom server and client(s), we use the concept of socket programming, we will also be using the concepts of multi-threading to deal with the numerous clients.
- The client-server network model is one of the most widely used networking models. In a client-server network, a specific server and clients are connected to the server.
- The server has to uniquely identify a new client’s request so, for the unique identification, we can assign a name to the client. This name will also help us to display the user’s message when the user sends any message.
- In this project, we are using some in-built modules of Python like
socket,sys,time,errno,select. - We are first creating a connection, then we will receive the message using the
recv()method, and then after all the processing, we can close the connection using theclose()method.